This week is asynchronous serial communication. Here are my notes:
the most important parts
Serial: two computers communicating one bit at a time via electric pulses Asynchronous: the two computers are keeping track of time independently
Three things the two computers need to agree one:
- Electrical: what is the voltage of the pulses? (3.3V? 5V?)
- Data rate: How often is a bit of data sent? (9600bps)
- Logic: Does low voltage mean the bit is a 0 or a 1?
One byte of data is sent every 1/9600sec (or whatever the agreed upon speed), as ASCII (or binary or whatever the agreed upon format). If we tell Arduino Serial.write(), Arduino will deliver the data as binary, only using one byte (thus limited to a range of 0–254). But if we use Serial.println() instead, Arduino will send up to six bytes for a value between 0 and 1023: the four numeric characters, a newline character, and a carriage return.
!! ONLY ONE PROGRAM CAN ACCESS THE (hardware) SERIAL PORT AT A TIME. When we upload code to the Arduino, we are uploading via serial port, hence we cannot have any other programs trying to access the same serial port at the same time.
Lab: Intro to Asynchronous Serial Communications
In addition to Arduino's Serial Monitor, we can read what Arduino is writing/printing from the terminal! We first want to list the relevant ports:
ls -1 /dev/cu.*
lsfor list-1or-lto list on separate lines or list details, respectively/devdirectory keeps special device files for all devices/dev/cu*matches for CU (call-up) devices that call out of a device/system, as opposed to TTY device to call into a system. They are the two parts to each serial communication port, and in this case we're interested in the call out because we're reading/receiving info from the device. (Sparkfun)
And then print what that port is sending:
cat /dev/cu.usbmodem11201
catfor concatenate/dev/cu.usbmodem11201is the call-out for my Arduino this time around (the number at the end changes depending on which physical port on my laptop my Arduino is plugged into)
And the different formats that Arduino can print in:
const int pot1 = A3;

void setup() {
  Serial.begin(9600);
}

void loop() {
  int value1 = analogRead(pot1);

  // different formats for value1
  Serial.print(value1); // decimal value
  Serial.print(" \t ");
  Serial.write(value1); // raw binary (in Serial Monitor this gets converted to ASCII)
  Serial.print(" \t ");
  Serial.print(value1, BIN); // ASCII-encoded binary value
  Serial.print(" \t ");
  Serial.print(value1, HEX); // hex value
  Serial.print(" \t ");
  Serial.print(value1, OCT); // octal value
  Serial.println(value2);
}
And what it prints out in the Serial Monitor (which defaults ASCII). Terminal prints out the same.
717 	 ⸮ 	 1011001101 	 2CD 	 13150
717 	 ⸮ 	 1011001101 	 2CD 	 13150
719 	 ⸮ 	 1011001111 	 2CF 	 13170
717 	 ⸮ 	 1011001101 	 2CD 	 13150
717 	 ⸮ 	 1011001101 	 2CD 	 13152
715 	 ⸮ 	 1011001011 	 2CB 	 13130
...
Lab: Serial Input to P5.js
For this lab, I wanted to figure out the bare minimum I needed to communicate from the web browser to my Arduino. I wanted to code outside of the p5 ecosystem, but am still using p5.serialcontrol (which uses p5.serialserver) and p5.serialport as the glue—in the future I want to investigate how to do this with just the node serialport that the p5 version is built on top of.
At its core, we need a server that has access to the serial port we want (p5.serialcontrol/p5.serialserver), which also ferries the data over to any web clients that request it. We then need client-side code (p5.serialport) that can open a web socket connection to the server and request that information.
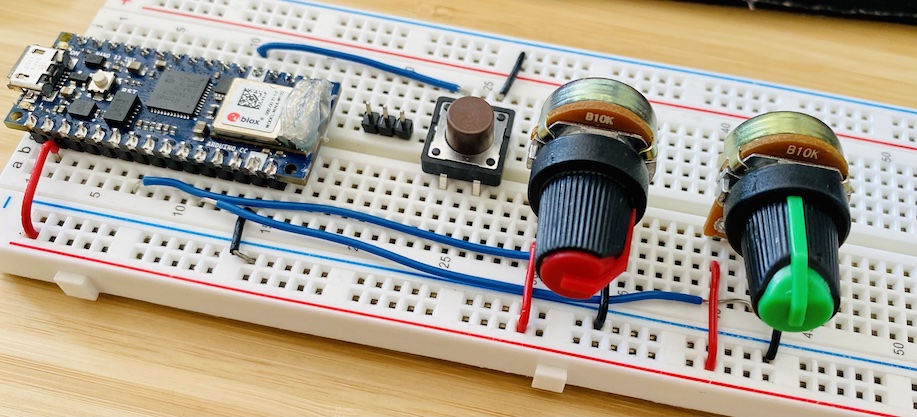
And I thought it'd be fun to recreate Etch-a-Sketch from my childhood, the game with two knobs where one controls the x-axis and another controls the y-axis. I also added in a button for reset.
For the Arduino code, I used JSON to send along the x/y positions and the reset button state, adapted from an example Tom sent:
/*
   Followed JSON example from:
  https://github.com/tigoe/html-for-conndev/blob/main/serialport/ArduinoSendJSON/ArduinoSendJSON.ino
   Installed https://librarymanager/All#Arduino_JSON
*/
#include <Arduino_JSON.h>

const int pot1 = A3;
const int pot2 = A7;
const int button = 2;

JSONVar outgoing;

void setup() {
  Serial.begin(9600);

  // initialize button pin
  pinMode(button, INPUT_PULLUP);
  // setup JSON object
  outgoing["x"] = 0;
  outgoing["y"] = 0;
  outgoing["reset"] = 0;
}

void loop() {
  int xValue = analogRead(pot1);
  int yValue = analogRead(pot2), 1;
  int buttonState = digitalRead(button);

  // update JSON
  outgoing["x"] = xValue;
  outgoing["y"] = yValue;
  outgoing["reset"] = !buttonState; // pull-up so flip state around

  // send
  Serial.println(outgoing);
}
For the web code, I only needed one HTML file, but funnily enough forgot how to start up a server without node and a full build system. So for future reference, I only need to run python -m SimpleHTTPServer 8000 (but I'll have to reload the page myself 😂).
Here is my etch-a-sketch.html:
<!DOCTYPE html>
<!-- HEADER CODE taken out for brevity, it loads in p5, p5.serialport, and lodash -->
<body>
<canvas width="1024" height="1024"></canvas>
<div id="position"></div>
<script>
// set up serial
let serial = new p5.SerialPort();
let portName;
// set up canvas
const size = 1024;
const canvas = document.querySelector("canvas");
const ctx = canvas.getContext("2d");
// grab div element for text
const textEl = document.querySelector("#position");
// first search for correct port
serial.on("list", (ports) => {
// ports is an array of port names
// so search for the one that includes "usbmodem"
portName = _.find(ports, (port) => _.includes(port, "usbmodem"));
// once we have the correct port, open serial connection
serial.open(portName);
});
serial.on("open", () => {
console.log(`port ${portName} open!`);
});
serial.on("data", () => {
const data = serial.readLine();
if (!data) return;
const { x, y, reset } = JSON.parse(data);
// if reset is true, clear canvas
if (reset) {
ctx.clearRect(0, 0, size, size);
}
// set hue based on dot location
const hue = ((x + y) / (2 * size)) * 360;
ctx.fillStyle = `hsl(${hue}, 50%, 70%)`;
// draw a dot at the location
ctx.beginPath();
ctx.arc(x, y, 3, 0, 2 * Math.PI, 0);
ctx.fill();
textEl.innerText = `drawing at ${x},${y}`;
});
serial.list();
</script>
</body>
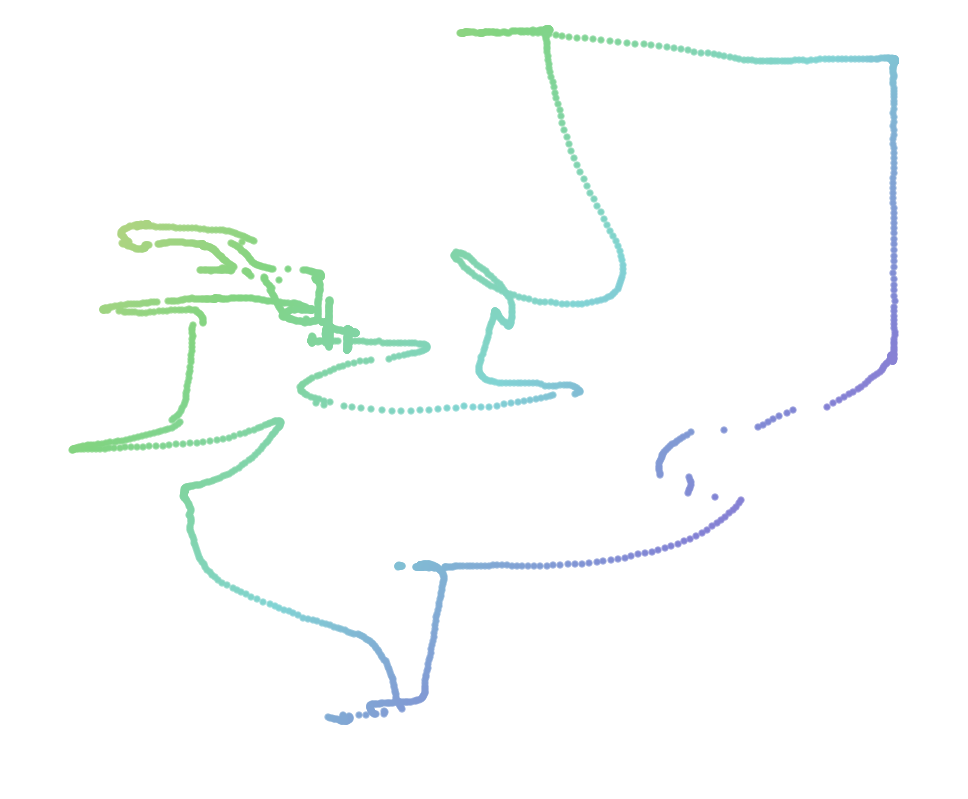
</html>And of course, the result was terribly noisy what with my two potentiometers stuck directly into the breadboard:
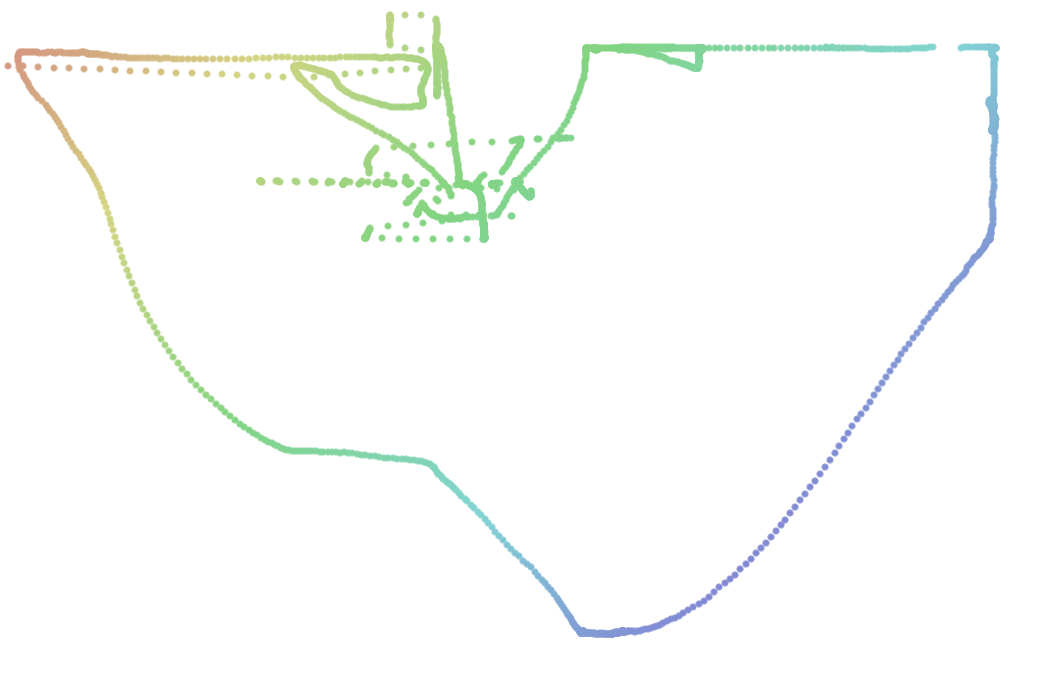
So I decided to connect the potentiometers to the breadboard with wire connectors, which provided for much stronger connections on both ends, greatly reducing the noise.
But the readings still had a variance of 5–10, so I adapted the Arduino Smoothing example:
/*
Followed JSON example from:
https://github.com/tigoe/html-for-conndev/blob/main/serialport/ArduinoSendJSON/ArduinoSendJSON.ino
Installed https://librarymanager/All#Arduino_JSON
Smoothing code adapted from:
https://www.arduino.cc/en/Tutorial/BuiltInExamples/Smoothing
*/
#include <Arduino_JSON.h>
const int pot1 = A3;
const int pot2 = A7;
const int button = 2;
JSONVar outgoing;
// smoothing
const int numReadings = 30;
int allReadings[2][numReadings];
int readIndexes[2] = {0, 0};
void setup() {
Serial.begin(9600);
// initialize button pin
pinMode(button, INPUT_PULLUP);
// setup JSON object
outgoing["x"] = 0;
outgoing["y"] = 0;
outgoing["reset"] = 0;
// setup smoothing arrays
for (int potIndex = 0; potIndex < 2; potIndex += 1) {
for (int thisReading = 0; thisReading < numReadings; thisReading += 1) {
allReadings[potIndex][thisReading] = 0;
}
}
}
void loop() {
int xValue = smoothReadings(analogRead(pot1), 0);
delay(10);
int yValue = smoothReadings(analogRead(pot2), 1);
delay(10);
int buttonState = digitalRead(button);
// update JSON
outgoing["x"] = xValue;
outgoing["y"] = yValue;
outgoing["reset"] = !buttonState; // pull-up so flip state around
// send
Serial.println(outgoing);
}
int smoothReadings(int reading, int potIndex) {
int readIndex = readIndexes[potIndex];
// add reading to array
allReadings[potIndex][readIndex] = reading;
readIndexes[potIndex] += 1;
// if at end of array, wraparound
if (readIndexes[potIndex] >= numReadings) {
// ...wrap around to the beginning:
readIndexes[potIndex] = 0;
}
// add all numbers together
int total = 0;
for (int thisReading = 0; thisReading < numReadings; thisReading += 1) {
total += allReadings[potIndex][thisReading];
}
return total / numReadings;
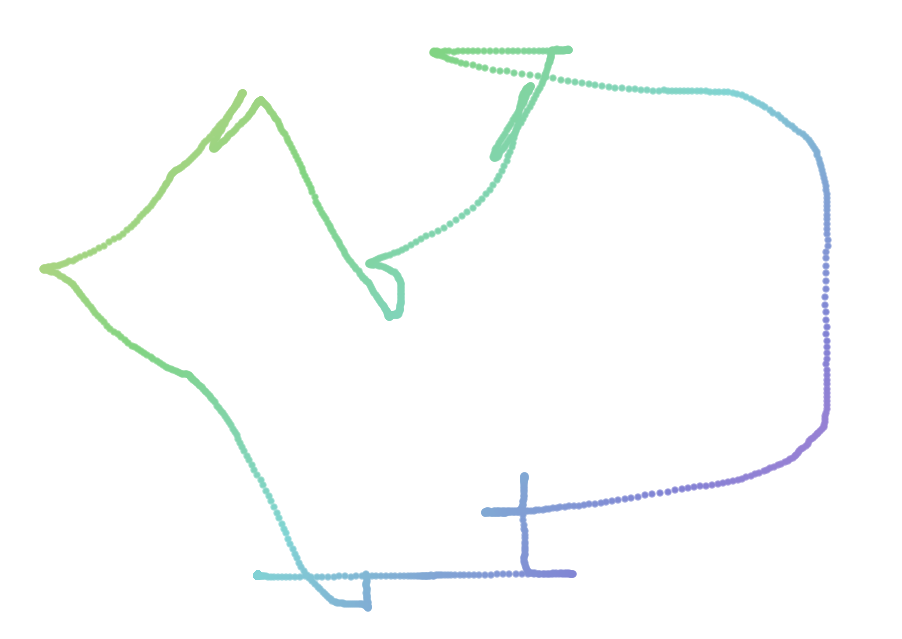
}And then finally, Etch-a-Sketch as I had imagined it!
And here is a gallery of my pitiful attempts at drawing a heart (and one where I just gave up hahaha)—it's so hard!